|
|
PowerBug PC Power State Manager Companion Program for TempElert (C) 2003 ItWorks |
|
|
PowerBug PC Power State Manager Companion Program for TempElert (C) 2003 ItWorks |
PowerBug is a unique and compact program that allows you to control the power state of your
PC or a remote PC or server. It is a companion program for TempElert that can be
run from the TempElert "run a program on alarm" option so that you can shutdown
mission critical computers that may be damaged by high temperature conditions.
For more information on the TempElert Ethernet Thermometer system see www.tempelert.com
PowerBug can run as an
application, or as a service, ensuring it can be started automatically on
mission critical servers. For workstations with the ability to run as a service,
it can be placed in the "Startup" folder to be executed on PC startup.
It can perform these main functions either locally or remotely:
Power off PC immediately or on schedule
Pop up a remote warning screen
Shutdown Gracefully
Reboot your PC
Log off
Lock your PC
Go to standby or hibernation mode
Wake up another PC using Wake on LAN functions
Control a remote PowerBug program via TELNET
All actions can be done locally or on a remote PC (if the remote PC is running
the PowerBug program).
These actions can be performed immediately or scheduled, by using a built-in scheduler.
All actions and options can also be controlled by command line options. This way, you can easily integrate
PowerBug in your TempElert "Run Program on Alarm" conditions. You can also
create and run a BATCH file of PowerBug commands using its command line
execution mode. For example, create a BATCH file that pop up notifies all users
on a portion of your network that a shutdown will occur due to an over
temperature condition, and then perform the shutdowns 1 minute later.
PowerBug is very small (170 kilobytes) and is very light on resource usage, it can be left running on PC Workstations and Servers with minimal impact on the CPU and Memory usage of these machines.
Windows 98/ME/NT4.0/2000/XP Both Workstation and Servers are supported
Administrator Privileges for installing and running are required
Ethernet adapter with TCP/IP networking installed
Access to port 3210 for remote shutdown operations on both initiating and controlled PC
Internet Explorer 4.0 or higher because it uses some common controls that are shipped with IE.
Installation on a local or
remote machine is very easy, just copy the PowerBug.exe file somewhere where you can find it
( such as a folder named C:\PowerBug) and double-click the executable.
To uninstall, simply delete the PowerBug.exe file. PowerBug stores its settings in the registry, so you should remove them also, either by selecting ‘Remove settings’ from the file menu or by manually removing them from the registry using ‘regedit.exe’
(WARNING: using regedit can damage your windows configuration, so be careful what you do!). The key that you can safely delete is
HKEY_CURRENT_USER\SOFTWARE\PowerBug
If PowerBug starts up, then it first looks for settings in HKEY_CURRENT_USER. If it cannot find any, then it looks in HKEY_LOCAL_MACHINE. This way you can define global settings and per user settings. You will have to create the global settings manually.
To delete the PowerBug service, choose ‘Remove service’ from the service menu. The settings are automatically removed. To manually remove the service settings, delete the registry key
HKEY_LOCAL_MACHINE\SYSTEM\CurrentControlSet\Services\PowerBug\Parameters
Other registry keys that may be lying around then the service is removed are:
HKEY_LOCAL_MACHINE \System\ControlSet00x\Services\PowerBug
HKEY_LOCAL_MACHINE \System\ControlSet00x\Enum\Root\LEGACY_PowerBug
These should disappear when your computer is rebooted. They can be safely deleted when the service is removed.
Back to the Topic Menu
When you double-click the PowerBug executable, the main window is shown. Here you can select which action to perform and select the appropriate options. To execute the desired action, simply hit the ‘Do it’ button.

Figure 1
PowerBug supports the following actions:
Logs off the current logged on user.
Reboots the computer.
Shutdown the computer.
In NT/2000/XP this will display the standard message ‘It is safe to shutdown you computer’.
In Win9x/Me this will PowerBug your PC if your hardware supports it
This action will physically power off your computer.
Your hardware must support this, for example an ATX motherboard and power supply should support it, but an old AT motherboard probably doesn’t support it.
You also have to have ACPI or APM enabled in your bios. And the power options must be correctly configured in the windows control panel. If Windows performs a PowerBug when you do a normal windows shutdown
from the start menu, then it will also work with this program.
To enable PowerBug in Windows NT, you will need a hal.dll that is capable of shutting down your workstation. You can try one that's supplied with
service pack 4 (or higher): hal.dll.softex
Just extract the service pack (with the /x option),
There are several machine-specific HAL.DLL’s, and you MUST extract the matching HAL*.DLL.SOFTEX from the service pack. To avoid
problems when someone overwrites the good HAL.DLL with a bad one it's better to rename HAL*.DLL.SOFTEX to
%SystemRoot%\System32\HALPOWER.DLL for instance, copy the line in %SystemDrive%\BOOT.INI which loads the current system, alter the description and append " /HAL=HALPOWER.DLL". Now one can choose between the two HALs and has a fallback if the new one fails.
If you like NT to automatically PowerBug at shutdown, set the following registry key to 1: HKEY_LOCAL_MACHINE\Software\Microsoft\Windows NT\CurrentVersion\Winlogon\PowerdownAfterShutdown
If your PC supports it, then this will put your PC into standby mode (sleep mode). If you get a strange error message, then probably on of your device drivers doesn’t support standby. Standby is not supported on NT.
If your PC supports it, then this will put your PC into hibernate mode. If you get a strange error message, then probably on of your device drivers doesn’t support hibernate. You also have to have hibernation enabled in your power settings of the windows control panel (windows 2000 or above). Hibernate is not supported on Windows 95 or NT.
This action will lock your workstation. This is only supported on Windows 2000 or above.
This action allows you to start up a remote
PC. This remote PC must support Wake-On-LAN. This means that you have to have a network card that is connected via an extra wire to the motherboard (or power supply) to provide some power. In the system BIOS, Wake-On-LAN must also be enabled.
How it works:
The network card constantly monitors the network for a ‘Magic Packet’ when the computer is switched off. This magic packet is a series of bytes that is sent over the network. A magic packet consists of a header (6*0xFF) and the MAC address of the network adapter repeated several times (16 times), for example if your MAC address is 01:02:03:04:05:06 (6 bytes), then the magic packet looks like this:
FFFFFFFFFFFF010203040506010203040506010203040506010203040506010203040506010203040506010203040506010203040506010203040506010203040506010203040506010203040506010203040506010203040506010203040506010203040506
The network adapter recognizes the sequence and triggers the power supply to turn on the computer.
When this radio button is selected, then the action is performed on the local computer. This radio button is unavailable when the action is Wake-On-LAN. This is because there’s no way that you can turn on your own computer...
When this radio button is selected, then the action is performed on a remote computer. You have to click the ‘Specify’ button to specify on which remote computer to perform the action.
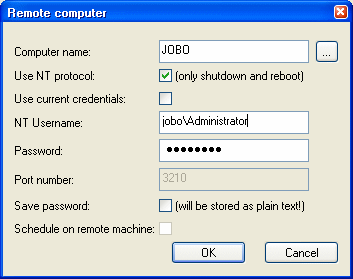
When the action is anything else than Wake-On-LAN, you are presented with the following dialog box:
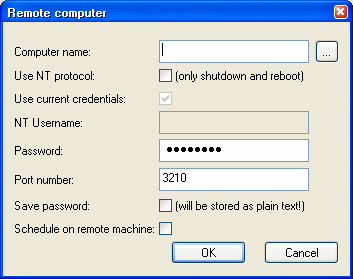
Figure 2
Computer name: This is the name (or IP address) of the remote computer
Use NT protocol: When you select this, then the standard NT protocol/authentication is used to reboot or shutdown the remote computer.
These are the only two options supported in this mode!
Figure 3
You have to specify whether you want to use the credentials of the user that you used to log into windows. In that case, you don’t have to supply a username and password.
If your current account is not allowed to shutdown the remote machine, then you can specify another username and password to connect to the remote machine that has the rights to shutdown the machine. This username can be a username of your current domain, then you only need to specify the username and password. If the user is from a different domain or the remote computer’s local domain, then you have to prefix the username with the domain name (e.g.: DOMAIN\Username), see figure 3.
Note that if you currently have a drive mapping of printer mapping to the remote machine, you cannot specify another username, this is an NT restriction.
This mode is only supported from and to NT/2000 computers. No Windows 9x/Me support!
When you do not select the 'use NT protocol' checkbox, then PowerBug must be running on the remote machine, either as a service or interactive with the ‘Allow remote’ option enabled.
When that is the case, then all actions are possible on the remote machine and it doesn’t matter which version of windows is running there. Of course, you can still only perform actions that the remote OS supports…
Password: Here you can specify the password that gives you access to the remote machine, leave blank if no password was specified by the remote PowerBug program.
Port number: Here you can specify the port number where the remote PowerBug program is listening to
Save password: When you save your settings in the main PowerBug screen, then the password for the remote machine is also saved. This will store the password as plain text in the registry!
Schedule on remote machine: When you don’t use NT authentication, then you can choose to do scheduling locally or on the remote machine. If you choose remote scheduling, then PowerBug must be running on the remote machine and you can stop your local PowerBug when the action has been submitted to the remote machine. Otherwise, you have to leave your local PowerBug program running until the time arrives.
When the action is ‘Wake-On-LAN’, then you are presented with the following dialog box:
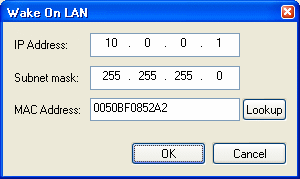
Figure 4
You have to specify the remote computer’s IP address, subnet mask and MAC address. The IP address and subnet mask are necessary to calculate the broadcast address. The magic packet is only broadcasted to the right subnet.
The MAC address is the physical hardware address of the computer’s network adapter. You can click the ‘Lookup’ button to fin the hardware address. This performs a ping to the remote computer and then looks into the
ARP table for the IP address. This means that the lookup may not always work correctly. If the lookup fails, then you must get the MAC address from the remote computer itself by inspecting the network adapter’s properties. The MAC address is a series of 12 hexadecimal
numbers. Some adapters may display the MAC address as XX-XX-XX-XX-XX-XX, but in
PowerBug it must be specified without the dashes.
Executes the desired action immediately when you press the ‘Do it’ button.
Executes the action at a certain moment in time. Click the ‘Schedule’ button to specify when to execute the action.
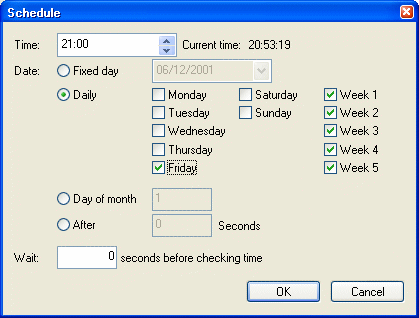
Figure 5
In the time field, you can specify the time when the action must be performed. The time format is hh:mm (0-23 hours).
The date radio box lets you choose the days on which the action must be performed:
Fixed day: Performs the action only once on the specified date. The date format is dd/mm/yyyy
Daily: Performs the action on the days of the week that you specify. You can also select the weeks of the month on which to perform the action. For example you may choose to reboot your PC at each Friday of weeks 1 and 3. This option requires that you install the PowerBug service.
Day of month: Performs the action on a specific day of the month each month. For example you may choose to reboot your PC every 1st of the month. This option requires that you install the PowerBug service.
After x seconds: Performs the action after the specified number of seconds.
Executes the action when some running process finishes. Click the ‘Process’ button to specify the process.
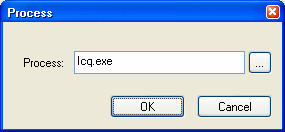
Figure 6
Here you can type the exact process name of choose the name from the current process list by clicking the ‘…’ button.
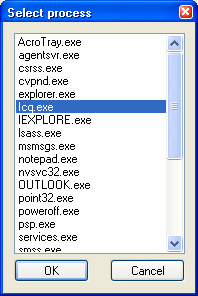
Figure 7
PowerBug will poll the running processes every second. When the specified process is not running, the action will be executed. This can be useful for shutting down your
PC when a certain program has finished or even as a watchdog to reboot the
PC when a program that should be running has died.
With this option you can give a warning message to the user before performing the
action. Click the ‘Message’ button to specify the message properties:
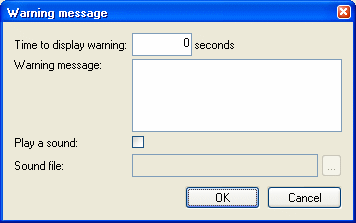
Figure 8
You can enter the number of seconds that the warning message must be shown. When the seconds have passed, then the action is performed.
You can also specify the message text that must be shown.
If you want a sound to be played when the dialog box is shown, then you can select the ‘Play a sound’ checkbox. Then you must also specify the sound file that must be played. If the action must be performed on a remote computer, then the sound file must also exist on the remote computer!
This option allows you to run a program before the action is executed. This can be useful to properly shutdown some other program before shutting down your PC. Click the ‘Program’ button to enter the program options:

Figure 9
You must enter the program that must be executed, or choose it from a list by clicking the ‘…’ button. You can also specify the startup directory for the program of select it from a list by clicking the ‘…’ button.
If you need to run multiple programs, then you should put them inside a batch file and then call the batch file from within
PowerBug.
This option is useful for forcing running applications to close. Otherwise some applications may not exit when windows is shut down because they popup a dialog box or because they ’hang’. This option kills all running programs before logging off, rebooting, shutdown or
PowerBug.
This also implies that any changes made in running programs will not be saved, so for example if you have a text editor open with unsaved changes, then the editor will be closed without asking you to save the changes!
When this option is selected, then the PowerBug icon will be visible in the system tray when the ‘Do it’ button has been pressed and a non-immediate action has been selected. Otherwise, PowerBug will seem to have disappeared and there’s no way to make it reappear.
When this option is selected, then you will be able to cancel any chosen action (except when ‘Immediate’ execution is selected). You will be able to cancel the action from the system tray and in the warning dialog (if those options are set).
When this option is selected, then other computers can connect to your PC and do all actions that PowerBug supports on your PC remotely. This is useful when running PowerBug as a service and when you’re the network administrator, then you can reboot remote machines from your PC. Click the ‘Settings’ button to specify remote control options:
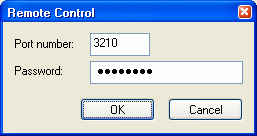
Figure 10
You can specify the TCP port number where PowerBug listens to for connections. You can also specify a password that remote computers must enter before they gain access to your PC. This password is encrypted and stored in the registry.
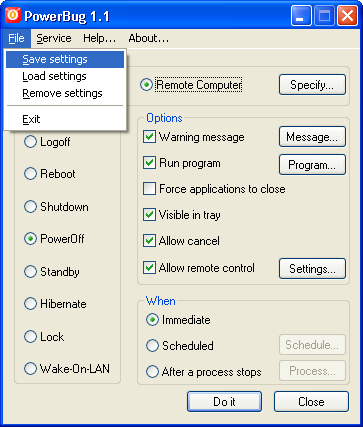
Figure 11
Save Settings: This saves the current settings to the registry. The next time you start PowerBug, it will read these settings from the registry so that you don’t have to set you preferred settings again.
Load Settings: This reads the settings from the registry and overwrites any changes made
Remove Settings: This removes all settings from the registry and restores the default settings.
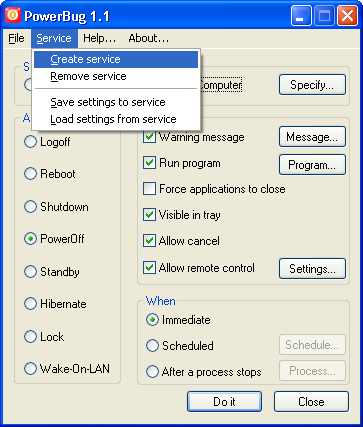
Figure 12
Create service: This creates the PowerBug service. This makes PowerBug run in the background and can even run when you’re not logged on. The current settings are saved to the registry so that the service can run with these settings. When the ‘visible in tray’ option is selected, then the PowerBug service is accessible via the system tray. The service will only execute some action when the ‘Scheduled’ option is selected, otherwise PowerBug will just start up and will be visible in the system tray (if that option was selected of course).
Remove service: This removes the PowerBug service. If the service is currently running, it is stopped (only on NT/2000/XP). On 95/98/Me you will have to reboot in order to stop the service. Removing the service will also remove the service settings.
Save settings to service: This will save the current settings to the service. On NT/2000/XP, the service will also be restarted to pick up the new settings. On 95/98/Me, you will have to reboot for the service to pick up the changes.
Load settings from service: This will read the service settings from the registry and make them the current settings.
If you have Windows NT/2000/XP, then you can always check the event log (application log) for messages from PowerBug. Here you can find information and error messages about the actions that were performed.
You can control every option and setting from the command-line. This makes PowerBug excellent for use in batch files. Some options have changed since previous releases, so check your batch files! If you do PowerBug /?, you will get an overview of all the options (look above for a description of all the settings):
Usage: PowerBug action [options]
Actions: logoff, reboot, shutdown, PowerBug, standby, hibernate, lock or WOL
Options:

-warn 		: Show a warning message before doing the action
-warntime s 	: Show the warning message for s seconds
-playsound 	: Play a sound when the warning is displayed
-soundfile “f” 	: Specifies the .WAV file that must be played
-msg "m" 		: Specifies the warning message, use \n for a newline character
-force 		: Force applications to close
-wait s 		: Wait s seconds before checking the time
-remote m 		: Do the action on the remote machine m (name or IP)
-remschedule	: Do the scheduling on the remote machine
-use_nt 		: Use the NT protocol to shutdown/reboot a remote machine
-port p 		: Use port p to connect to the remote machine
-username u 	: User NT username u to connect to the remote machine
-password p 	: Use password p to connect to the remote machine
-run 		: Run a program before doing the action
-program "p" 	: Runs program p before doing the action
-directory "d" 	: Start the program in directory d
-notray 		: Do not show PowerBug icon in the system tray
-nocancel 		: Do not allow the user to cancel the action from the tray or in the warning dialog
-immediate 	: Perform the action immediately (default)
-scheduled 	: Perform the action in a scheduled manner
-time hh:mm 	: Perform the action at the specified time
-date dd/mm/yyyy	: Perform the action on the specified date
-days [m,t,...] 	: Perform the action on the specified days of the week (m,t,w,th,s,su)
-weeks [1,..,5]	: Perform the action on the specified weeks (default=all weeks)
-day d 		: Perform the action on the specified day of the month (1-31)
-seconds n 	: Perform the action after n seconds
-process p 	: Perform the action when a process named p does not exist anymore
-ip ip 		: Specifies the IP adress for WOL
-subnet s 		: Specifies the subnet mask for WOL
-mac m 		: Specifies the MAC address for WOL
-allow_remote 	: Allow remote control
-remote_port p 	: Listen on port p for commands
-remote_pswd p 	: Set a password that clients must give for remote control
-simulate 		: Simulate all actions, do not perform them
-minimize 		: Start minimized in the system tray
-quiet 		: Don't display error messages
-save_settings 	: Saves current settings to the registry
-remove_settings	: Remove the settings from the registry
-save_svc_set 	: Save current settings to the service
-remove_svc_set	: Removes the service settings
-create_service 	: Creates the PowerBug service, including the settings
-remove_service 	: Removes the PowerBug service, including the settings
Examples:
The following command shuts down the PC after giving a 20 second warning.
C:\Program Files\TempElert\PowerBug.exe shutdown -warn -warntime
20 -msg "You will be logged off in 20 seconds"
The following command creates a service that shuts down the PC everyday at 23:00, forces all applications to close, gives a warning to the user, plays a sound file when the warning dialog is shown and listens for remote control using a password:
C:\Program
Files\TempElert\PowerBug.exe shutdown -warn -warntime 60 -msg "You
PC will PowerBug in 60
seconds\nPlease save your work" -playsound -soundfile "d:\winnt\media\ringin.wav" -force -scheduled -time 23:00 -days m,t,w,th,f,s,su -allow_remote -remote_pswd password -create_service
The following command will shutdown a remote computer using the standard NT protocol:
C:\Program
Files\TempElert\PowerBug.exe shutdown -remote computer -use_nt -username computer\administrator -password password
The following command will reboot the computer after a program (cmd.exe) has finished:
C:\Program
Files\TempElert\PowerBug.exe reboot –process cmd.exe
The following command will wake up a remote computer:
C:\Program
Files\TempElert\PowerBug.exe wol –ip 10.0.0.1 –subnet 255.255.255.0 –mac 0050BF0852A2
The following command will log off the user 60 minutes after logging on when the command is put inside the startup folder. The user will not be able to see that PowerBug is running and will not be able to cancel it:
C:\Program
Files\TempElert\PowerBug.exe logoff –scheduled –seconds 3600 –notray –nocancel –force
This command simply powers off your computer:
C:\Program
Files\TempElert\PowerBug.exe PowerBug
You can remotely control PowerBug by starting it as a service and setting the ‘Allow remote control’ option. You can control it by using PowerBug itself and selecting a remote computer, or you can control it by using telnet to the port where PowerBug listens to (default 3210).
For example TELNET [computername] 3210. You’ll see a welcome message like this:
201 Welcome to PowerBug 3.0
PowerBug uses a protocol like FTP or SMTP with commands and reply codes. You enter a command and
PowerBug will reply with ‘2xx message’ on success or ‘5xx message’ on error.
You can enter the following commands:
QUIT 		Terminates the connection
HELP 		Shows this help
PASSWORD p 	Authenticates the client with a password
ACTION a 	The action to perform (logoff, reboot, shutdown, PowerBug, standby, hibernate, lock, wol)
WHO w 		Who must perform the action (local, remote)
WHEN w 		When must the action be performed (immediate, scheduled, after_process)
SIMULATE s 	Simulate the action (on, off)
COMPUTER c 	The remote computer name
MAC m 		The remote computer mac address (WOL)
IP i 		The remote computer ip address (WOL)
SUBNET s 	The remote computer subnet mask (WOL)
WARNING w 	Show warning before doing the action (on, off)
WARNTIME w 	The number of seconds to show the warning
MESSAGE m 	The warning message
PLAYSOUND p 	Play a sound when showing the warning (on, off)
SOUNDFILE s 	The WAV file to play
RUNPRG r 	Runs a program before doing the action (on, off)
PROGRAM p 	The program to run
DIRECTORY d 	The startup directory for the program
SCHEDULE s 	The type of schedule (fixed_day, daily, day_of_month, after_x_seconds)
TIME t 		The time when to do the action (hh:mm)
DATE d 		The date when to do the action (dd/mm/yyyy)
DAYS d 		The days of the week when to do the action (m, t, w, th, f, s, su)
WEEKS d 	The weeks of the month when to do the action (1, 2, 3, 4, 5)
DAY d 		The day of the month when to do the action (1-31)
WAIT w 		The number of seconds to wait before checking the time
SECONDS w 	The number of seconds to wait before doing the action
PROCESS p 	Wait for process p to finish
FORCE f 	Force applications to close (on, off)
CANCEL c 	Allow the user to cancel the action (on, off)
SHOW 		Show current settings
VERSION 	Show current PowerBug version
DOIT 		Do the action
STOP		Stops the current scheduled action

Example:
telnet [computername] 3210

201 Welcome to PowerBug 3.0
action logoff
250 OK
warning on
250 OK
message You will be logged off in 10 seconds
250 OK
warntime 10
250 OK
doit
250 OK
quit
201 Bye bye
Connection closed by foreign host.
Back to the Topic Menu
When PowerBug is minimized or it has a scheduled action, it sits in the system tray. You can right click the icon, then a popup menu appears:
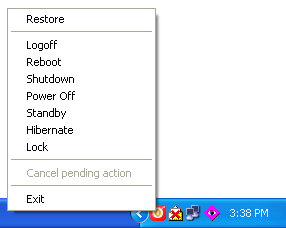
Figure 13
Restore: Restores the main window and removes PowerBug from the system tray. Only available when not executing a scheduled action.
Logoff/Reboot/Shutdown/PowerBug/Standby/Hibernate/Lock: Quickly performs the action requested.
Cancel pending action: Cancels a scheduled action and restores the main window again. Only available when a scheduled action is executing and the ‘Allow cancel’ option is activated.
Exit: Quits PowerBug
Updated 2/14/2003 by Anthony Watts